


48V (24V x 2) 16" Cordless Snow Thrower, (2) 4.0Ah Batteries & 4A Dual Rapid Charger Included
Key Features
Key Features
- ✓Push Button Start
- ✓Quiet Operation
- ✓Battery and Charger Included
- ✓3 Year Warranty
Get Notified
Sign up to be the first to know when it's here
SHOP WITH CONFIDENCE


Compatible With :


Description
Description
Welcome to a Life. Powered. By Greenworks. Take the hassle out of winter with the Greenworks 48V (24Vx2) 16" Snow Thrower, ideal for sidewalks, driveways, and patios. Includes 2×24V 4.0 Ah batteries and charger for full cordless convenience, clearing a 16" wide by 10" deep path with its single-speed poly rust-proof impeller. Compatible with all Greenworks 24V batteries—we recommend 4.0 Ah or higher for best results. Features 180° chute rotation throwing snow up to 25' and a folding handle for easy storage and transport. Spend less time shoveling and more time enjoying winter with the Greenworks 2X24V 16" Snow Thrower—backed by a 3-year tool & battery limited warranty.
- [POWERFUL MOTOR]: High-performance 1.5 kW motor delivers reliable performance, consistent runtime, and quiet operation. Clears a 16" wide path with a 10" clearing depth.
- [PRECISION CHUTE CONTROL]: 180° chute rotation lever with an improved design reduces snow leakage while throwing snow up to 25' with easy directional control.
- [ERGONOMIC DESIGN]: Lightweight, well-balanced design makes snow clearing easier and more comfortable.
- [NEVER STOP CLEARING]: Includes 2×4.0Ah 24V POWERALL™ batteries and charger. Combined to deliver 48V of cordless snow-clearing power, this system easily tackles a 4-car driveway on a single charge and recharges fully in approximately 120 minutes.
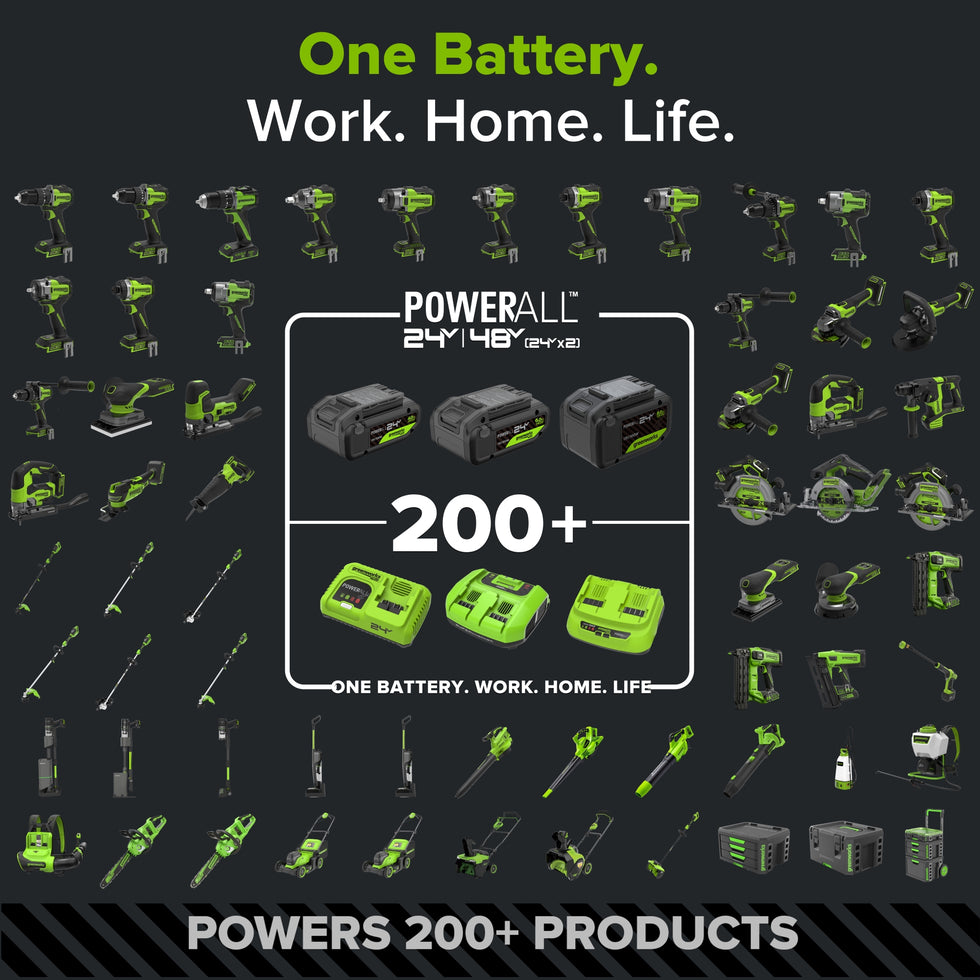
- [BATTERY COMPATIBILITY]: Works with 200+ Greenworks 24V POWERALL™ tools for ultimate flexibility and convenience.
- [COLD WEATHER READY]: For optimal performance, store batteries at room temperature (16°C–23°C). If the unit doesn’t start in cold conditions, allow batteries to warm and try again.
- [INDUSTRY-LEADING WARRANTY]: Enjoy confidence and peace of mind with a 3-year tool and battery warranty.
Specifications
Specifications
-
Voltage2X24V
-
ClassificationSingle-Stage
-
MotorBrushed
-
Speed SettingsSingle-Speed
-
No Load Speed2200 RPM
-
Rated Power of Motor1.5 kW
-
Batteries/Battery Included(2) 24V 4.0Ah High Power Batteries
-
Total Watt-Hours172.6Wh (86.4Wh/Battery)
-
Driveway Clearing CapacityUp to 4-Car Driveway
-
Charge Time120 Minutes
-
Clearing Depth10"
-
Clearing Width/Path16"
-
Discharge Distance25'
-
Chute ControlManual
-
Chute DeflectorAdjust Up/Down
-
Impeller MaterialPlastic
-
Adjustable Skid ShoesNo
-
Skid Shoe MaterialMetal
-
DrivePush
-
Product Dimensions (Assembled)43.3" x 36.2" x 17.3"
-
Tool Only Weight28.9 lbs.
-
Package Dimensions22" x 20.7" x 18.3"
-
Package Weight37 lbs.
-
-
Battery Specifications
-
Weight1.8 lbs.
-
Size5.5" x 3" x 2.8"
-
-
Charger Specifications
-
Weight1.2 lbs.
-
Size7.5" x 6.3" x 2.8"
Manuals
Manuals
-
Download:
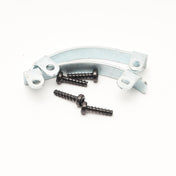
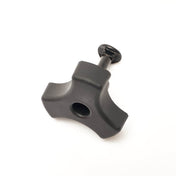
Includes
Includes
- Greenworks 48V (24Vx2) 16" Cordless Snow Thrower
- (2) 24V 4.0Ah Batteries
- 24V 4A Dual Port Rapid Charger
- Owner's Manual
- 3-Year Tool & Battery Warranty
Product Videos


Frequently Asked Questions
Frequently Asked Questions
- Does temperature affect my battery performance?
- Can this unit be used on gravel?
- What is the recommended ambient temperature range?
- How large of a driveway can be cleared with this product?
- How difficult are Greenworks single-stage snow throwers to assemble?
- My chute is clogged with snow, what should I do?
- How far can the snow thrower discharge snow?
- Are skid shoes wearable parts?
- What battery is compatible with this tool?
- Can it be used on slopes or hills?
- Can I put chains on the tires to prevent slipping?
- What are the benefits of having an adjustable impeller speed?
- What is the impeller made of?
- Is it difficult to use snow shovel/thrower with an extension cord?
- What are the benefits of a circular cord head?
- Are the Skid Plates wearable? What are they made of?
- Can you lubricate the snow chute to throw snow further?
- How should I store and care for my Greenworks battery to ensure the best performance and longest lifespan?
- Can I leave my battery in the charger after charging it?
- Why do batteries cost so much more than the tool?
- How do I store the battery? Can I leave the battery in the garage or shed?
- My battery is stuck in my tool. How do I get it out?
- How do I check the charge on my battery?
- Can I use any Greenworks battery in any Greenworks tool?
- Are there certain tools that can’t accept all same voltage batteries?
- Do all batteries of the same voltage use the same charger?
- The charger indicates that my battery is fully charged but I was just using it and it depleted. Why isn’t it charging?
- My charger is flashing red when I engage my battery. Why is this happening?
- My charger has a solid red light on it when I engage my battery. What is happening?
- Are your chargers made for 220V or 120V outlets?
Lithium-Ion batteries are resilient to cold temperatures. However, we always recommend charging and storing the battery in a safe, dry, room-temperature environment. Long-term cold weather use/storage can allow the internal temperature of the battery to drop away. If the internal temperature of the battery drops below -17°C voltage output may be reduced, and battery communication may be affected. However, if a cold battery is brought back into a safe, dry, room temperature environment and allowed to warm up (should take no more than 10-20 minutes) then there should be no long-term negative impact on battery performance or lifespan. Please note that we recommend placing the battery on the charger after it has returned to room temperature to ensure maximum charge when in use.
We do not recommend using our single-stage snow throwers or our snow shovels on gravel surfaces. Gravel, stones, or any loose surface material will be picked up and thrown by the snow thrower, causing damage to the unit and potentially nearby property and people.
Snow throwers can be stored at any temperature if the environment is sheltered (indoors) and dry. Batteries and chargers should always be stored indoors at room temperature.
Our single-stage snow thrower kits are often supplied with enough battery capacity to cover the average 4-car driveway. It is important to note that the overall run time received is ultimately determined by the load acting against the unit and will fluctuate.
Our units have been designed for quick and easy assembly! The majority of single-stage units can be assembled in approximately 15 minutes. All instructions are clearly detailed within the owner's manual supplied with your purchase. If you should have any questions or concerns, we would be happy to provide assistance.
Heavy or icy snow may cause the discharge chute to become clogged while in use. If you do get a clog, DO NOT attempt to unclog it with your hands or feet. Instead, turn your machine off and wait at least 10 seconds for it to fully stop. Then, use a chute-clearing brush or a similar object to clear the clog (not included). Operating Tip: If you notice that the chute is clogging often, try adjusting the angle of the chute and impeller speed (if applicable).
The distance that snow is thrown varies depending on the type of snow, wind, and angle of the chute deflector. Light snow will have a greater throwing distance in comparison to wet/heavy snowfalls.
Yes. Greenworks skid shoes are wearable; wearable parts carry a 90-day warranty against wear and tear.
Only Greenworks batteries, chargers, and machines of the same voltage are compatible and interchangeable with one another. Please be advised that the higher the ampere-hour (Ah) rating is on a battery, the more run time it can provide.
Yes, this unit can be operated on slopes and or hills. Always exercise extreme caution when operating on slopes and ensure you have proper footing and balance at all times.
No, the wheels on our single-stage snow thrower models are not designed for use with tire chains.
The benefit of having an adjustable impeller speed ensures that the unit can be used in a variety of areas and conditions. A lower auger speed usually translates to a smaller throwing distance - low speed also gives the user more control so that you can direct the snow where you want and avoid overshooting or re-covering previously cleared areas. When operating the unit at a higher speed, you can throw the snow further when the space allows and clear the area more quickly. Operating Tip: If you notice that the chute is clogging often, try speeding up the auger.
Most Greenworks impellers are made of plastic. The exception is the Greenworks 80V 22”, which uses a metal/rubber impeller assembly. The dual-stage models use fully metal impellers.
It does take time to get used to having a cord attach to your snow shovel, we suggest keeping the electric cord as close to the outlet as you can and then move away from the outlet, so the slack always stay on the side you are moving away from or put the cord over your shoulder. That way it is always behind you while using the snow shovel but over time it will get easier to manage.
The benefit of a circular cord head; the head of the power cable is designed to be circular; this is to ensure the power cable from the unit can securely hold an extension cord and to reduce any chance of moisture or snow from getting into the two parts. The head of the power cord is flexible, any universal single head outdoor extension cord will fit, simply squeeze the sides, and insert the extension cord.
Greenworks skid plates are a wearable; wearable parts carry a 90-day warranty against wear and tear. Most of our units have a metal skid plates except for our 22" snow thrower models which have a nylon design.
Lubricant can be used to reduce clogging which can prevent the snow thrower from throwing at capacity. However, please keep in mind the heavier the snow the less it will be thrown. To reduce the issues with snow clogging which can affect performance you can use an ice repellent or Teflon spray.
We want you to get the most out of your tools, and that starts with understanding how to care for your battery. Proper storage and handling not only extend battery life but also ensure your tools are ready to perform when you need them most. A Quick Note on Lithium-Ion Battery Performance All Greenworks batteries use lithium-ion technology, which offers powerful, consistent performance without the memory effect found in older battery types. However, lithium-ion batteries are sensitive to temperature extremes—both heat and cold can affect performance and longevity. That’s why proper storage and care are essential for keeping your battery in peak condition. Best Practices for Battery Storage and Use: Store batteries indoors in a cool, dry location—away from direct sunlight, humidity, or extreme temperatures. This protects internal components and preserves performance. Only connect the battery to the charger when actively charging. When not in use, unplug the charger and keep the battery disconnected. If storing for an extended period, charge the battery fully before putting it away. Check the charge every couple of months. If it drops, recharge it before returning it to storage. This helps maintain battery health over time. Allow the battery to reach a safe operating temperature before use. For snow throwers and cold-weather operation, cold batteries may not power on. Let the battery warm to room temperature indoors before inserting it into the tool. Kindly note: Once the battery is at room temperature and installed, the current generated while the tool is running will help keep the battery warm. As long as the battery starts at room temperature, you should not experience issues even when working in cold outdoor conditions. For other tools/hot weather operation, if the battery has become hot from use or charging, allow it to cool before reinstalling. Indoor storage helps avoid performance issues related to both hot and cold environments and keeps your battery protected year-round.
The battery chargers do have auto cut offs to prevent it from over charging. However, we do advise customers to remove the battery from the charger after it has been fully charged and to also unplug the charger from the outlet, as this is good electrical safety practice to do so. This will also help to prevent false defect readings and allows the charger to reset itself each time it’s used to charge a battery.
The battery is the most important component for a battery-operated unit. Please be assured we price our batteries with the cost of material, manufacturing, and current market pricing in mind. Batteries are the costliest items to manufacture and ship in any kit. Full kits including a tool, battery, and charger are priced affordably so that consumers can begin building that line of tools and move forward purchasing tool-only units. When you purchase batteries on their own, it is more notable the cost that they carry.
When the battery is not in use, we suggest storing it indoors, in a cool dry area - away from direct sunlight. Leave the charger unplugged and the battery disconnected from the charger unless it needs charging. It is recommended to store the battery with a full charge, and if it is being stored for a period where no use is expected, to check on the charge every couple of months. If you notice the charge has dropped, we advise charging the battery back up to full before returning it to its safe storage place. Following these steps will ensure you receive the most out of the battery life.
60V/ 80V Products: To remove the battery, push and hold the battery release button. Then, pull the battery pack straight out. In some cases, if the springs underneath have gotten locked down you might have to give a small push to the top of the battery to re-engage them to help the battery pop up. The battery pack fits snugly into the product to prevent accidental dislodging while in use; it may require a strong pull to remove. Before use, be sure that the rails on the battery and product are free of debris that could cause the battery to get stuck. 24V/ 40V Products: To remove the battery, press the latch button on the battery pack down and hold. Pull the battery pack out of the handle. The battery pack fits snugly into the product to prevent accidental dislodging while in use; it may require a strong pull to remove. Before use, be sure that the rails on the battery and product are free of debris that could cause the battery to get stuck.
Press the battery capacity indicator (BCI) button located at the end of the battery. The lights will illuminate according to the battery capacity level. Please note this switch does require a firm direct push using the tip of your finger. If the button is not being fully engaged, the lights will not activate. Please also be advised the lights only stay on for a few seconds and will automatically turn off. Another reason the lights will not power on is if the battery is completely depleted of power and needs to be charged.
Our batteries are interchangeable with tools that are of the same voltage platform only. The difference between batteries of the same voltage is the ampere-hour (Ah) rating. The higher the ampere-hour (Ah) rating on the battery is the more run time it has to offer.
There are a few exceptions. • Our 80V 20” snow thrower models 2600402 / 2605202 / 2601302 manufactured prior to September of 2017 can only use 2.0Ah or 2.5Ah battery models. • Our 60V 8.0Ah battery model 2957102 cannot be used in the following tools due to the height: dual-port lawnmowers, pressure washers, or the wet/dry vacuum.
Yes, they do. Each product line has designated charger models that can charge all batteries in that voltage platform, no matter the Ah rating.
Putting a battery that was just in use onto the charger often results in a false full charge signal. Remove the battery from the charger and allow it to rest in a room temperature area for approximately 10-15 minutes before charging.
When the battery is inserted into the charger and the status LED blinks red, remove the battery from the charger for 1 minute, then reinsert. If the status LED blinks green, then the battery is properly charging. If the status LED is still blinking red, remove the battery and unplug the charger for 1 minute. After 1 minute, plug in the charger and reinsert the battery. If the status LED blinks green, then the battery is properly charging. If the status LED is still blinking red, then this likely indicates an issue with the battery or charger and should be taken care of either with our warranty team or by means of replacement.
This typically indicates that the battery is at the wrong temperature to be charged. Allow the battery and charger to rest indoors at room temperature until they are no longer hot/cold and attempt charging again.
Greenworks chargers sold in the USA and Canada are designed for use on 120V outlets only.
